ColourSpace is unique when used for 3D LUT Calibration as it uses no fixed structure step-by-step walk-throughs, as these are very restrictive approaches to calibration, and often mean the results are far from optimal for any given display.
Using this guide it should be possible to get accurate results from ColourSpace without having to fully understand the software, although it is highly recommended to learn and fully understand the tools within ColourSpace as there are many, many additional capabilities not covered by this guide.
- ColourSpace INF/XPT/PRO/CAL/LTE & HTX/HTP/HTL
- ColourSpace Manufacturer Specific PRO/LTE & HTP/HTL
ColourSpace 3D LUT Display Calibration
The real requirement for display calibration is actually very obvious, as without it you will never see images as the production team, specifically the DoP & Colourist, intends. This is true for displays used within film and TV productions, as well as for the home consumer, be it Gaming or Home Cinema use. It is equally true for Medical applications, where medical image assessment requires critical display calibration.
Grading Displays Why Calibrate
Therefore, display calibration is required so that the viewed images match as closely as possible the colour standards expected by the images being viewed, as such video standards define how an image should look on any given display.
Unfortunately, nearly all displays are provided with very poor factory calibration out of the box, especially home TVs which tend to come with over saturated colours, widely inaccurate gamma/EOTF and colour temperature, and incorrect black and white levels, with such settings aimed at looking pretty in the TV show-room.
Beyond this, many TVs have what are claimed as professional calibration pre-sets, such as ISF or THX. Unfortunately such settings are often nothing more than marketing gimmicks, as rarely are they accurate. At best, they are just less wrong.
(That is not to belittle the intentions of the ISF or THX - it is just simple fact that no factory calibration can ever be accurate, as the same settings are applied en-masse to all TVs of the same model, as dictated by cost.)
Regardless of the initial state of any factory calibration, all displays drift over time, and should be recalibrated on a regular basis. We recommend at least once a month, and manufacturers, such as EIZO, concur with this:
When using a monitor for graphics, stable colour can be maintained at all times by conducting calibration at a frequency of once every 200-300 hours. An LCD monitor used for graphics should be calibrated at least once every 200-300 hours (in ordinary use, once per month).
ColourSpace 3D LUT Calibration Process
How to calibrate with 3D LUTs
ColourSpace uses a very simple 4-step approach to 3D LUT calibration, without the need to have pre-defined or fixed structure step-by-step walk-throughs. The tools used in each calibration step can be applied totally independently, enabling each process to be used as required within any calibration operation, without restriction.
-
Display Pre-configuration
Set-up the display to have minimal internal Colour Management control, with basic Black level & White level settings
-
Profiling
Profile the display with a suitable Patch Sequence, which could be a preset ColourSpace Profile, or a User Generated Patch Sequence
-
LUT Application
Generate and apply the Calibration LUT, using the Profile Data and the Target Colour Space
-
Verification
Re-profile the display with the Calibration LUT active to verify the final calibration
It is this unrestricted approach to calibration that helps makes ColourSpace so powerful, combined with the additional LUT Manipulation tools that enable issues such as poor probe response to be overcome.
Initial Display Setup
Bsst pre-calibration settings
3D LUT calibration of Home TV displays is often very different to the calibration of Professional displays, as home TVs have many more (often useless) colour controls that just don't exist in professional displays, as they are not necessary when the underlying display electronics has been designed correctly. Unfortunately, as home TVs often have very poor internal signal processing, which manufacturers attempt to overcome through the provision of totally unnecessary user controls.
A classic example of such unnecessary colour controls is the use of 6 axis colour calibration - RGBCMY - as all secondary colours (CMY) should simply be a direct calculation of the Primary (RGB) colours, with no need for independent control.
This 3D LUT calibration guide will define the different approaches required for each type of display - both Professional and Home TV - using ColourSpace.
Before commencing with 3D LUT Calibration it is imperative that the majority of inbuilt display calibration and management options are deactivated prior to accurate profiling and calibration being performed, with just the minimum of controls used to set basic Black & White clipping levels, and possibly set the Gamma/EOTF response and Grey Scale. The goal is to maximise the available display gamut, while placing gamma/EOTF relatively close to (if necessary, slightly below) the final target value, with the same for Grey Scale (Colour Temperature).
With this understanding in mind, there are six manual pre-calibration set-up steps to be checked before commencing 3D LUT Calibration, depending on the display being calibrated. Professional displays will need far less pre-calibration adjustments compared to home TVs.
-
Black & White clipping
Ensure no clipping of shadows or highlights
-
Peak White
Set desired peak white level
-
Best Picture Mode (Home TVs only)
Select mode that provides best potential for LUT based calibration
-
Gamma/EOTF (Optional)
If desired, set EOTF to closest to target
-
Grey Scale/White Balance (Optional)
If desired, set white point/colour temperature to target
-
Gamut/Colour
Set display to widest gamut, which may be set via Picture Mode
While the above list is fairly simple, it will be necessary to re-visit most entries for a second, or even third time, after checking other entries. For example, for home TVs the Black & White levels will need to be re-verified after the best Picture Mode has been found - but you really need to set the black and white levels before evaluating the display's different Picture Modes, as incorrect black & white levels will make a Picture Modes look wrong...
It is imperative to understand that such a repetitive and circular iterative approach to manual setup is a requirement due to to the way just about all manual TV calibration controls work.
Manual Display Controls
The actual controls that will be used during manual pre-calibration setup will vary depending on what is provided by the specific display being calibrated. Knowing what controls are available, and what they are used for is a critical step in gaining accurate final calibration.
It is also important to note that many home TV displays have very poor controls, to the point that some controls do not work as expected (including wrong control labeling, incorrect functionality, and just plain poor design!). It really is key to know if the display in question has controls that operate as expected, or not.
Picture Mode
On Home TVs Picture Mode selects different display-wide settings, on-top of which the other display controls work (often with different controls active or not, depending on the Picture Mode selected). For accurate display calibration the need is to find the mode that is the least inaccurate. This is usually Movie or Cinema mode, which contrary to their names is actually closer to the correct colour and gamma/EOTF setup for TV's, and has nothing to do with trying to emulate cinema imagery. Additionally, when selecting these modes many home TVs provide additional manual controls, as described below. If a User Mode is available, that is often the best to select, as it provides the best blank canvas with which to work, with the best selection of additional manual controls.
(Professional displays will not have such controls.)
Colour Profile
Colour Profile options (or Picture Options, or some similar name) on some displays are usually a sub-set of Picture Mode, and provides yet another level of options. As with Picture Mode, the best setting to chose is often User or Custom. But, it is always best to verify each mode with direct profiling.
(Professional displays will not have such controls.)
Backlight
Backlight, where available, controls the overall illumination level used for the screen, and can be used to set the overall brightness. Depending on the display technology, the control can affect both peak white and minimum black, with more effect on white. And unlike Brightness and Contrast controls, there is little chance of clipping. The primary function of the Backlight control is to enable Peak White to be set, in conjunction with the Contrast control if available.
Backlight controls are found on most LCD displays, although some displays combine this with their Brightness control. Displays with self illuminating pixels have no Backlight, although what is really Contrast may be labeled Backlight.
A second function of Backlight is to move between Night and Daylight settings, if you cannot accurately control the viewing environment (limit daylight contamination). Changing the Backlight setting can usually be performed without (badly) affecting other settings.
Iris
Projectors often have an Iris control (and possible bulb power) which is equivalent to Backlight on an LCD display, and should be used in a similar way.
Brightness
Brightness controls the point at which black detail on the screen becomes clipped or crushed if set low, or if set too high will cause blacks to look grey and washed-out.
Contrast
Contrast controls the point at which white detail on the screen clips or crushes if set too high, and will make whites appear dim, grey and washed-out if set too low. Contrast needs to be set in conjunction with Backlight where available, and on displays without a Backlight is used to set the peak white value directly.
Sharpness
While Sharpness has no direct effect on calibration, it does have a perceived effect if set incorrectly. Usually, incorrect means set to a too high value, causing ringing artefacts around image edge transitions.
(Professional displays will not have such controls.)
Colour
Colour usually controls the colour saturation within the display's fixed gamut. That means it will increase the saturation colours that are within the display's gamut, but will have little or even no effect on colours at the gamut edge. For 3D LUT calibration Colour should be set to its Null setting - disabled - allowing the maximum available display gamut.
(Professional displays will not have such controls.)
Tint
Tint is often a very simple colour ratio balance, usually altering the ratio of green to red, making one colour more prevalent compared to the other. For 3D LUT calibration Tint should be set to its Null, or disabled setting.
(Professional displays will not have such controls.)
Hue
Hue can be present as an alternative to Tint, and changes the overall screen colour based on a vector rotation. As with Tint, for 3D LUT calibration Hue should be set to its Null, or disabled setting.
(Professional displays will not have such controls.)
Tone
Tone, or Colour Temperature, is usually a simple set of presets ranging from Cool, to Warm 1, and Warm 2. The correct setting is the one that sets the white point colour temperature closest to the desired standard. Warm 2 is usually closest.
(Professional displays will not have such controls, although they may offer Colour Temperature pre-sets.)
Gamma/EOTF
Gamma/EOTF controls are often a simple selection of presets, meaning the closest value to the desired target should be used, or a slider with relative values provided to set the closest value. However, the offered presets/values are often not the same as the suggested value they are labeled with, so the result must be profiled (measured) for verification.
Many Home TVs have additional Advanced Settings. Theses controls usually include more options for further CMS (Colour Management System) adjustments, but may also included some of the controls listed above.
White Balance
White Balance sets the grey scale neutrality (colour temperature), often via 2 point, 10 point, or 20 point (or similar) multi-point controls, depending on the display. 2 point allows for the colour temperature to be set individually for low brightness levels and higher ones. Multi-point provides for control in 10% or 5% (or similar) steps throughout the brightness range.
Note: Often, the multi-point controls are not exactly as per the % values stated on the display's GUI menu, and some experimentation may be required to define the correct control points.
Professional displays will not have multi-point controls, offering just 2-point via RGB Offset/Bias/Gain/Cuts/Drive, as listed below.
With multiple point White Balance you can often use the controls as fine adjustments for Gamma/EOTF, as changing the RGB values for each point by the same amount, positive or negative, will change the relative luminance of the selected point, so altering gamma/EOTF at that point. Multi-point controls should not be used for 3D LUT calibration.
RGB Bias & Gain
On many displays White Balance is controlled by settings called RGB Bias, Offset, Cuts, or similar for the low-end, and RGB Gain, Drive, or similar for highlight control. Such controls work as for 2 Point White Balance.
Multi-Point Gamma/EOTF
Some displays - very few - offer an advanced Multi-Point Gamma/EOTF control, which can be used to finely tune the overall gamma/EOTF response of the display. Such multi-point controls should not be used for 3D LUT calibration.
Colour Space
Different Colour Space selection provides control of the display's gamut, within the limits of the screen's capabilities. The only option we are interested in is Custom, as this allows the user to set the colour space as accurately as possible to the desired colour space standard. This is often via controls for RGB primary as well CMY secondary colours. Such controls should be set to Null, or disabled, for 3D LUT calibration.
Having secondary CMY controls goes against standard display calibration colour science, as secondary CMY colours should be a simple and direct calculation from the primary colours, and shows the poor colour management inherent in most home TVs.
Most home TVs also have a plethora of additional modes/controls that must be disabled/set to null for accurate display calibration. Such modes include:
- Dynamic Contrast
- Advanced Contrast
- Black Tone
- Black Correction
- Advanced Contrast Enhancement
- Auto Light Limiter
- Live Colour
- Dynamic Colour
- And many, many more...
Such modes, if active, will defeat any and all attempts at accurate display calibration.
The Toolbox
What is needed for accurate calibration?
The tools required for 3D LUT Display Calibration will vary depending on the display being calibrated, and the image workflow to be used for viewing after calibration.
ColourSpace
The specific version of ColourSpace to be used will depend on the requirements of the display, the probe in use, and the workflow the user requires, as well as the need for professional or Home Cinema LUT based calibration.
Probe
A probe is required to measure values from the display, enabling the correct manual settings to be made. The cheapest probes we recommend are the CaliContrO MCA02 and ColorChecker for the lower end of the calibration market, often combined with the MYIRO-1 or i1Pro spectros. At the higher end of the market the Klein K10-A and CR-100 tristimulus probes are preferred, often partnered with Colorimetry Research or Jeti spectros.
Patch Generator
Patch Generation is required to enable known stimulus colours to be sent to the display being calibrated, enabling the probe to take readings and allow ColourSpace to compare the measured values with the actual target vales for the required colour space during 3D LUT generation.
Many professional displays include in-built patch generation, directly controlled via ColourSpace. For displays without in-built patch generation, and external patch generator will be required.
For most calibration work the HDMI output from the ColourSpace PC is perfect for this, as it enables Closed-Loop (the probe and patch generator are both under ColourSpace control) measurements.
(EDID and graphics card/chip set signal scaling needs to be understood and managed correctly. See the HDMI User Guide page, as well as the EDID Viewer within Graph Options.)
Very useful alternative Patch Generators are the HDMI Raspberry Pi based PGenerator, as well as LightSpace Connect, an Android and iOS App that can be run on any Android or Apple mobile phone or tablet, as well as any TV or other display/monitor through the use of Screen Mirroring, MHL Cable, AirPlay, FireTV device, Apple Digital AV Adaptor, Chromecast, etc.
If it is desired to use an external Patch Generator, ColourSpace is compatible with many different systems, from the BoxIO and IS-mini LUT Boxes, to Resolve, Scratch, and Mistika grading systems, as well as the Lumagen Boxes, DVDO Test Patch Generator, and madVR systems, the already mentioned PGenerator, plus many others.
Calibration Test Patterns
Test Patterns are used for two distinct applications. The primary use is to enable the manual setting of display controls, for black and white levels for example. The second application is to enable controls that are not directly colour related to be set - such as Sharpness.
A number of Test Patterns are built in to ColourSpace to assist with display set-up.
(The in-built Test Patterns follow the Patch Scale values set within Settings. See the Patch Scale & Resolution page.)
Calibration Discs
Calibration Discs can be used as an alternative to patch generators, specifically with the DIP mode (Display Independent Profiling) capability of ColourSpace, which enables the calibration disc to automatically play the correct colour patches as required for ColourSpace profiling, as well as providing a plethora of alternative Test Pattern images. We recommend the use of Ted's LightSpace Calibration Disc.
Pre-Calibration Display Setup
With the required tools at the ready it's time to start the Pre-Calibration process, to set up the display in readiness for final 3D LUT calibration.
This guide will focus on the basic requirements, but any competent individual will quickly understand that there are additional possibilities that can be utilised to enhance the whole calibration procedure. This website contains additional User Guides that can be reviewed to advance user knowledge.
Pre-Calibration Profile
Before embarking on any calibration workflow it is a good procedure to first profile the display to assess its present calibration status. With ColourSpace this is simple to perform using the system's Profiling capabilities, and will help define the areas of manual display control that need particular focus.
- Start ColourSpace, and navigate to Probe Options and select the correct probe
- Connect the probe
- Allow 20 to 30 minutes probe warm-up time
- At the same time, start the display, and again leave for 20 to 30 minutes warm-up time
(To shorten warm-up times run dummy profile sequences, or use the Pre-roll option) - Select Profiling from the main ColourSpace window

Probe Matching
Probe Matching is a technique used to calibrate a Tristimulus colourimeter and display combination to a Spectrometer, on the same display. This means faster and cheaper filter based probes can be matched to slower and more expensive spectrometers, increasing the profile accuracy, while benefiting from the filter probe's speed and better black level reading.
Note: Internal probe matrices or correlation files should not be relied on for calibration accuracy.
The use of Probe Matching to a Spectro is always recommended, using ColourSpace's unique FCVM or MPVM probe matching, although the traditional FCMM option is also available.
Continue Pre-Calibration Display Setup
- Select Probe Options and set the required parameters for the probe and display combination

- Set Extra Delay Time if the display requires settling time between patch changes - (W)OLEDs and FALD displays for example - or if there is a noticeable delay in the patch changes on the display with respect to the patch window within ColourSpace
(Depending on the probe, the Auto button can be used to set the Extra Delay automatically for physical signal path delays) - From within the Settings menu, within the Luma Target section, the target Min and Max Y values for the display can be set manually to the expected target values
The Min & Max Y values do not need to be set at this point - as they can be changed at any time - but they set the Target Values, and are the basis for the reported Y accuracy during measurements, and so will affect the reported Delta-E values when performing Manual Measurements.
For initial profiling these can be set manually to the ideal values for the display to be profiled - such as 0.05 Nits Min, and 100 Nits Max, as is defined ideal for a Grade-1 professional SDR Rec709 display.

- Set the Target Colour Space from within the Settings menu
(The target colour space is the colour space the display is supposed to be matched to - Rec709, for example)
The Target Colour Space does not need to be set at this point - as it can be changed at any time, during profiling, or after profiling is complete - but it sets the Target Values, and in conjunction with Max & Min Y, is the basis for reported accuracy during measurements.
- Decide on the preferred Patch Generation workflow - Direct HDMI, internal display patch generator, external hardware TPG (Test Patch Generator), software based TPG, etc
- Set Patch Scale and Resolution bit depth as required for the display being profiled, in combination with the TPG being used
(For most situations Full or Legal will be correct for Patch Scale, and will set the Patch Sliders and in-built Patch Sequence values as required. Resolution bit depth should be set to match the display and TPG capabilities, with 8-bit being the default. See Patch Scale & Resolution for more information.) - Set Patch Size, Background, etc.
(Patch size and probe location - contact or non-contact - depends on the display technology being profiled, usually contact for LCDs, non-contact for displays that heat up substantially, such as WOLEDs, and also non-contact for projectors

- If using a professional display with in-built patch generator do not, at this stage, Upload Unity Bypass. Leave the display as is
(The intent is to assess the display's present calibration accuracy) - If using an external TPG that also has LUT capability the LUT will need to be set to Unity Bypass, to ensure just the display is being profiled, so any active LUT within the TPG is not profiled along with the display
- Using one of the integrated TPG's enables ColourSpace to run on its PC, and the Test Patch Sequence to run on the display to be calibrated under ColourSpace control, including patch size, ABL settings, etc
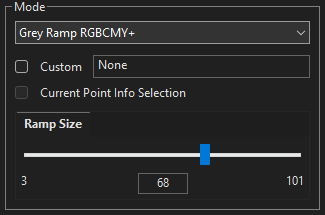
- From within the Characterisation menu select a Quick Profile, such as Grey, Primary & Secondary Ramp+, and set the Ramp Size
- Press Start, and profiling will start
Should a delay be needed on the start of profiling - to enable the room lights to be turned off, for example - use the Pre Roll option - The ColourSpace patch window and connected TPG will run through the selected Patch Sequence, plotting the results on the various graphs
While profiling it is possible to change the selected menu to Manual Measure, to see the patch values being displayed, as well as change the selected graphs to view the profile build-up while profiling
Additionally, the keyboard 'O' key can be used within the Manual Measure and Hardware menus to quickly Disable/Enable the TPG - After profiling is complete the various graphs can be inspected in further detail, zooming into them, quickly and easily displaying the accuracy/errors of the display, including a double click on any plot-point to see colour details in the Zoom and RGB Bars widgets, pop-up Point Info window, as well as direct point editing in higher ColourSpace license levels
(If desired, a second or even third profile can be performed using different Profile options, such as a Gamut Sweep or Memory Colours selected from the drop-down list, enabling further display evaluation)
Any errors within the profile graphs shows inaccurate calibration, and helps define the areas of the display that need looking at, including turning off Display Modes that can cause serious accuracy issues.

Bad Gamut can be inaccurate colours, smaller than target gamut, or as above, gamut roll-back & low gamut, which show very poor display internal colour management.

Bad Gamma/EOTF plots can show other issues, such as channel clipping.

Dif EOTF is an alternative plot of Gamma/EOTF, with the graph normalised into a horizontal line, making errors easier to spot.

Bad RGB Balance will show that the Grey Scale has colour contamination, and/or that the colour temperature is not accurate to the target colour space.

Bad RGB Separation shows issues with the independence of the display's colour channels, such as cross-coupling and luma errors of the individual colour channels, including grey scale issue.

Bad Clipping show as errors usually within the blacks, or whites.
The Graph Options menu within ColourSpace has additional tools that help evaluate the display profile data, including point isolation via various filters; tangent lines; access to the 3D Volumetric graphs, and an EDID view option for connected monitors, including via associated hardware such as Murideo SIX-G, SEVEN-G, and PGen.

A pop-up Points Info window can also be activated by Double Left Clicking on any graph point, with associated point information being provided in the Manual Measure menu, including the Target/Actual point values, and the Zoom and RGB Bars Widgets. Additionally, direct point editing is available in higher ColourSpace license levels.
Any graph can also be zoomed and positioned, and the 3D Volumetric graphs can be rotated.
With higher-level ColourSpace licenses, hovering over the 2D & 1D Graphs, such as CIE, EOTF, RGB Balance, etc., shows a Hamburger button that enables additional graph options, including a floating values window for any selected point. If Show and Enable have been selected for Point edit, after a point has been selected, hovering over it will display Point Adjust arrows, enabling the selected point to be manually adjusted, as well as allowing the values in the floating window to be directly edited. Repeated double clicking of a given point will cycle through all three RGB colours, should they all have the same coordinates.

As a point is adjusted, a yellow Tangent Line will show the deviation from the point's original location. Reset and Apply buttons also become enabled when a point has been repositioned.
If multiple points are adjusted, but not Applied, the point's dot marker will be shown larger than normal to signify an adjustment has been made. All individual adjusted points need to be Applied before the profile is Saved.
Note: When Apply is actioned is is likely other components within the graph will change, due to value interaction, as well as affecting other graphs, such as changes to grey scale points via the RGB Balance and CIE graphs altering EOTF.
Additionally, due to the complex nature of the RGB Balance graph, using the CIE graphs to alter grey scale values is recommended.
Any changes to a point are mapped live across all associated graphs, such that changes to grey scale points made in the CIE graphs will be mirrored within the associated RGB Balance, EOTF, RGB Separation graphs, etc. Using the pop-out floating graphs capability means all associated graphs can be viewed simultaneously while making Point Adjust changes.
Being able to directly adjust a point means that obvious probe error readings can be altered, potentially assisting with better end LUT Generation.
Note: The same 1D Graph adjustments are also available in the generated LUT via the 1D LUT graph, and may be a better option to correct grey scale issues.
The floating Point Adjust values window can be repositioned using the top bar, and if placed over its active point will re-dock back to its default location.
Self-Verification
The above display profile assessment is based on comparing the display to a given colour space standard, such as Rec709, based on the display's existing factory calibration.
However, a good way to really understand the underlying capabilities of any display is to clear/disable any/all calibration, profiling the display in its native state, and assess the profile matched to itself, making any volumetric issues simple to see.
Such Self-Verification is performed by extracting the display's native colour space from the profile using Extract Space.

Correcting Pre-Calibration Errors
With the Pre-Calibration profile data available the inaccuracies of the display can be assessed and the display reconfigured to correct for the errors.
For professional displays that really means disabling any internal calibration, including uploading a Null LUT to re-set any/all displays parameters to null, including any existing 3D LUT calibration. Refer to the specific User Guides for information on professional displays that are integrated with ColourSpace.
For consumer TVs it means selecting the best TV settings for the widest possible gamut before LUT based calibration.
Set Black & White Levels
The first Pre-Calibration settings to be set and verified are the relative Black & White clipping levels of the display. This can be performed using the Test Patterns built into ColourSpace, which flash to allow simple assessment of min and max levels, via the downloadable Light Illusion CalImages from the website, or using Ted's fantastic LightSpace Calibration Disc.
Whichever source you use, the process is much the same. Display the Brightness and Contrast (or similar) Test Pattern images on the display to be calibrated, and adjust the manual controls as required to limit clipping/crushing.
When displaying the Test Patterns on the display being calibrated it is imperative you understand the difference between TV Legal range - 16-235 (8-bit) - and Data range - 0-255 (8-bit), and if the system displaying the images is rescaling or not. You need to understand this to know if there will be below black or above white image detail, or not, and set the clipping levels accordingly. For most displays connected directly to the ColourSpace ZRO PC via HDMI/DisplayPort, the signal will be scaled according to the display's EDID info, meaning black and white levels will be the same on the display regardless if it being Data Range, or TV Legal, with the source set correctly.
Image rescaling is the normal image path workflow as it means black and white (and all points in-between) look the same on a TV Legal display, and a Data level display, and any variation on this points to an image path issue.
The following assumes the display is either Data Range, or if TV legal the system displaying the Test Patterns is rescaling from Data to TV Legal, meaning black and white levels will be the same on the display regardless.
ColourSpace Patch Scale Settings
The Patch Scale values within the Settings menu defines the global range within ColourSpace for any set values, and any profiling/measurement, as well as the TPG triplet values.
Therefore, if Legal is set, the patch sliders within Manual Measure will be limited to the sub-range of 16-235, within their full 0-255 range, for 8-bit Resolution.
(Any user defined Preset Patch List must also match the Patch Scale and Resolution, as set within Settings.)


The ColourSpace internal Test Patterns flash, to help spot the point at which clipping occurs.
(The Test Patters follow the Patch Scale values set within Settings, so will need to be set to Full to show any clipping issues correctly.)
- With the Brightness Test Pattern displayed as required, use the display's Brightness control to set the image such that all patches are JUST visible, with the darkest top left black patch more a feeling of being visible, than really visible
- With the Contrast Test Pattern displayed, use the display's Contrast control to set the image such that all patches are again JUST visible, with the brightest white patch more a feeling of being visible, than really visible

Brightness and Contrast Clipping can also be assessed via the Clipping graph within ColourSpace.
Run a Grey Ramp profile, and assess the graph for issues. Variation from the horizontal at either end of the plot indicates clipping.
Alternative Brightness/Contrast Controls
Some displays have Brightness/Contrast (and possibly Backlight) controls that do not function as expected, with Brightness acting more like Backlight, and Contrast just setting the peak clipping levels at any white level, with no direct Black Level control.
With such display the aim is still the same - to get the best Blacks Level, with the correct White Level, with no clipping at peak white (Black clipping probably being uncontrollable).
Set Peak White
Setting the peak white nits value at 100% white to the desired target value manually is optional, but may be preferable to using the 3D LUT to manage the peak white as it also minimises the black level for displays with independent back lights, such as LCD displays. For displays within an ideal viewing environment - one that is close to that encountered within a grading environment - and with Rec709 as the colour space target, the required value is 100 nits. For displays within a less than perfect viewing environment some compromises will have to be made - and that is a personal issue, based on what feels and looks perceptually right.
- To set Peak White manually, display a 100% white patch on the display, from any source - via the ColourSpace patch window, Ted's Disc, or any other method
- Place the probe on the patch (or aim at the patch if in non-contact mode), and from the ColourSpace Manual Measure menu select Repeat & Measure, and continuous measurement readings will be displayed within the Actual Measurement area of the menu

- While taking continuous measurements adjust the Backlight control on the display to get the target Nits reading
- If the display has no Backlight control, the Contrast control will need to be used to set peak white. Obviously, this could cause clipping if the Contrast value is set higher than set previously with the Contrast Test Pattern, so this defines the maximum Peak White the display can be set to
- Regardless, after setting the peak white value it is imperative that the Black and White levels are re-checked, as on many displays (especially home TVs) it is very likely they will be interactive, and clipping/crushing can be caused
(After the Black/White levels have been re-checked, the Peak White value will need re-checking too...)
Peak White Nits Level & Colour Temperature
For pre-calibration setup, it is often preferable to not correct the display's native colour temperature, with the correction made via the 3D LUT. Using this approach, the peak nits value used needs to be set to be higher than the post-calibration target nits, to allow for later correction via the 3D LUT.
To find the correct pre-calibration peak white nits value to set, either use the display's RGB balance controls, or the ColourSpace sliders, to temporarily set the peak white colour temperature to be accurate, using the CIE charts to define when the correct colour temperature is attained.
(If using the ColourSpace Sliders do not uses the RGB Zoom & Bars Widgets, as they track the slider target colour - the CIE charts are absolute.)
When the correct colour temperature has been set, use the display's Backlight/Contrast controls (depending on the specific display being calibrated) to re-set the target peak luma nits value while taking continuous readings.
With the correct target value reached, re-set the RGB balance or ColourSpace sliders back to their default settings. The peak white nits reading will now show the required higher pre-calibration value.
Set Best Picture Mode
On Home TVs, with the black & white levels set, the next step is to select the best Picture Mode to obtain the best initial start point for final 3D LUT calibration.
Professional display have no such control, although they may have a Colour Temperature control, which should treated as for Grey Scale Balance.
(After the best Picture Mode has been defined and selected, the black & white levels, and the Peak white Luminance value will need to be checked and potentially re-set.)
- Using the above defined Profiling process, select each available Picture Mode in turn, and run a Grey, Primary & Secondary profile, as well as Gamut Sweeps, and Memory Colours, and compare each of the measured results.
(The aim is to find the mode that provides the widest Gamut, NOT a Gamut that best matches the target colour space, and Gamma/EOTF that does best match the colour space target)
Remember to turn off all the unnecessary additional TV Modes that will prevent accurate calibration, and which will again require running a selection of Profiles after each change in Mode to assess the benefits for turning each mode on/off
Set Gamma/EOTF
With the best Picture Mode selected on any Home TV, and all unnecessary modes turned off, the next stage of calibration is to verify the display Gamma/EOTF and set to the desired colour space standard.
Professional displays rarely need this setting to be pre-configured, with the display just left at it's default Gamma/EOTF value after a Null Cube has been applied, and/or all other settings bypassed/disabled.
For non-HDR home TVs the target colour space will be Rec709, with a power-law gamma of 2.4, or possibly BT1886 (although we do not recommend BT1886). The best setting will depend on the gamma/EOTF controls available, and with many display that will be just different pre-sets, or a slider to set different power-law values.
- To test the Gamma/EOTF within a Home TV, from within ColourSpace select the target colour space from with Settings, and from the Characterisation menu run a Grey Ramp profile to assess the TV's gamma/EOTF for each available pre-set
Avoid using a TV's multi-point Gamma/EOTF capability, if available, as such settings will potentially fight with the later 3D LUT calibration. It is best to have a close and smooth pre-calibration gamma/EOTF, with the gamma/EOTF being slightly low (darker) if a more accurate result cannot be selected.
Set Grey Scale/White Point
With the Gamma/EOTF set correctly, it is possible to use the same basic approach to set Grey Scale/White Balance, if desired.
However, with many displays it is not necessary to set the Grey Scale/White Balance at all, as the later 3D LUT will take care of this very accurately.
(See Peak White Nits Level & Colour Temperature above.)
Depending on the display, Grey Scale Balance may be called White Balance, or RGB Gain, Bias, Offset, Cuts, Drive, or similar for 2-point control, and may also offer multi-point control, from 10-point, or more. If multi-point control is offered is should be avoided for later 3D LUT based calibration, as the settings can fight with the 3D LUT calibration.
(On many TVs, 2-point Grey Scale control uses 20% and 80% patch values. As such, these values are used within this setup guide.)
As stated, for most home TVs the target colour space will be Rec709, which sets the expected Grey Scale Balance at D65, which is x:0.3127, y:0.3290. In very simple terms the target for Grey Scale Balance is to set the entire grey scale range to these exact coordinates, using the probe readings as displayed in the Zoom Widgets, CIE charts, and the Actual Measurement values.
(For 3D LUT Calibration, the key focus is just to set the peak white Colour Temperature accurately, without worrying too much about the rest of the grey scale.)
- From within ColourSpace select the Settings menu, and select the desired colour space
- From the Manual Measure window open the Patch Colour window, and set the required grey scale value to match the display's Colour Temperature controls
(Patch values can be set via the sliders, or using Presets, loaded via .csv files) - Place the probe on the patch (or aim at the patch if in non-contact mode), and from the ColourSpace Manual Measure menu select Repeat & Measure, and continuous measurement readings will be displayed within the Actual Measurement area of the menu
- Adjust the display RGB High balance controls to hit the required xy values, which places the cross directly in the centre of the Zoom Widget, and balances the RGB and Delta-E Bars, repeating for each grey scale patch/white that matches the TV's adjustment controls

When adjusting RGB High values it is a common rule of thumb to leave Green alone, and just adjust Red and Blue. While this is a good basic rule, there is a potential problem if raising Red or Blue causes the colour channels to clip at 100% white, making the white balance at 100% incorrect, even though 80% is correct. So, 100% white needs to be checked after 80% Grey has been corrected, including using the Contrast Test Pattern to check for possible clipping.
Presets
The use of Presets to define patch colours is a very powerful capability of ColourSpace, and with ColourSpace ZRO enables any patch sequences to be perfectly matched to the required patch values for any TV's given CMS adjustments.
Regardless of a TV using 2 point, 10 point, 12 point, 22 point, Gamma adjustments, or any other number of patches for gamut or gamma, a Preset patch set can easily be generated to match the requirements perfectly, and automatically control the TPG.
Example Presets can be found on the General Downloads page.
For more information see TV Calibration Patch Sets and Patch Scale & Resolution.
Stabilisation
To aid with making manual changes, the Stabilisation function changes what patch colour is displayed during ColourSpace idle periods.
- When Stabilisation is activated the displayed patch will immediately change to the Stabilisation patch colour & size
- When making single Manual Measure readings, the Stabilisation patch colour & size will be shown when no measurement is being taken
- When performing a Characterisation or Auto Advance Preset Patch List profile, the Stabilisation patch colour & size will be displayed when the profiling ends
The use of Stabilisation also means the Patch Colour will not change when the Manual Measure Sliders are adjusted until a measurement is taken.
There is a second rule of thumb for RGB High adjustments that says RGB values should be reduced, never increased, to prevent potential clipping issues at 100%. This may, or may not, be a better approach than simply leaving Green alone... in reality a combination of both approaches is usually better. But always double and triple check with the Contrast Test Pattern to check for possible clipping after any RGB High adjustments.
There is a real potential issue on some displays with using 20% Grey for RGB Low balance, as the backlight on many displays - White LED illuminated LCD displays specifically - can be overly Blue, and the backlight colour can't be corrected for through calibration (it can only be changed by using a different backlight with a less blue spectral response, such as changing to a display with a full array RGB LED backlight). With LCD displays the backlight has an ever increasing influence on the display colourimetry as the brightness of the display gets lower. If a problem is encountered with 20%, move up to 30%, and don't worry about 20% and below.
When adjusting RGB Low values the rule of thumb is to only raise the necessary RGB values to attain Grey Scale Balance, and not reduce values. This is to prevent 0% blacks crushing. As with the RGB High rules of thumb, this is not always the best approach as lifting values may cause black to lift too much... Just always double and triple check with the Brightness Test Pattern to check for possible crushing after any RGB Low adjustments.
- Swap between the 100%, 80% and 20% patches and double and triple check the results, as altering one patch will effect the others
(100% white is the critical value) - If the display has multi-point Grey Scale Balance the controls should be set to default, as such controls can fight with later 3D LUT based calibration
- Run another Grey Only Profile, and verify the results, with attention being given to 80%-100%
- After Grey Scale/White Balance has been set, go back and re-verify Gamma/EOTF as it is likely it will have changed. This is because if all three RGB channels are raised or lowered in relative unison, the brightness at that point in the grey scale will be altered, as for a Gamma/EOTF correction
Set Gamut/Colour
If the display has Colour, or similar controls, they should be set to Default/Null/Bypass, or off, as such controls can only reduce the display's gamut, which needs to be left at the maximum Gamut possible. If necessary select each option in turn, and run profiles to assess the best setting.
Professional displays do not have such controls.
Good Pre-Calibration Setups
The following show examples of good/acceptable display pre-calibration setup.

Good Pre-Calibration Gamut configuration for final 3D LUT calibration is a Gamut that is wider than the desired target.

Good Pre-Calibration Gamma/EOTF configuration is close to target, and slightly low (darker) if a more accurate setting is not available.

Dif EOTF is an alternative plot of Gamma/EOTF, with the graph normalised into a horizontal line.

Good RGB Balance will show the Grey Scale tracking reasonably from around 20% upwards, with 100% (white) accurate.

Good RGB Separation shows all measurements track closely to the idea target, with no colour channel cross-coupling or luma or grey scale issues.

Clipping should show no major deviations either within the whites, or blacks.
Volumetric Gamut
A very powerful way to assess the underlying capabilities for calibration accuracy of any display using ColourSpace is to plot a volumetric pre-calibration profile against the display's own native gamut. A good display will show a near perfect volumetric plot, as the display is being compared to itself.


Using volumetric plotting, mapping the profile to the display's own native gamut shows the underlying Volumetric linearity of the display, which in turn defines the level of calibration accuracy the display is likely to be able to attain. A good display will have a near perfect self-mapped profile. Any Red points show a dE above 2.3, which shows underlying non-linear volumetric issues. Orange points show a dE of between 1 and 2.3, and Green a dE below 1.
The Cube view further assists in display assessment, by plotting the profile data in a Normalise form, enabling an easy visual understanding of non-linear volumetric errors, as any deviation from a pure cube shape denotes an error.
3D LUT Calibration
With the basic pre-calibration settings configured the next stage is to fully profile the display using a large Characterisation profile to measure all Volumetric Colours.
ColourSpace 3D LUT Calibration is very simple when compared to Manual Display Calibration, as most of the process is handled by the advanced Colour Engine mathematics within ColourSpace. Unlike alternative calibration systems, and due to the advanced Colour Engine, ColourSpace also separates the two main processes within the 3D LUT Calibration process - Display Profiling, and LUT Generation. This means there are five stages to the 3D LUT Calibration process, with the last three just different ways to verify the generated LUT and the final Calibration. And very uniquely higher ColourSpace licenses can natively generate LUTs that are 256^3 and beyond, maximising calibration accuracy.
With the ability to define larger native LUT sizes also comes the ability to profile with larger user defined patch sets, including the ability to define the Grey Scale patch count size independently to the volumetric Cube profiling size.
The native LUT size to be used within ColourSpace is defined from the Main Menu, from the Preferences option. Select LUT Generation Size, and enter the required cube size.
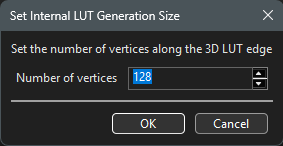
LUT sizes up to 256^3 and beyond are possible, depending on the available resources of the PC ColourSpace is running on.
LUT Calibration Workflow
-
Display Volumetric Characterisation
Profiling the display with a suitable Volumetric Patch Sequence, to accurately map the display
-
Generation of Calibration LUT
Using the profile to generate an accurate calibration LUT, to correct the display's underlying inaccuracies
-
LUT Checking
Initial assessment of the generated LUT to check for obvious errors that show potential issues with the initial profiling
-
Active LUT Verification
Verification of the LUT within ColourSpace, prior to uploading into the display/LUT Box/Grading system
-
LUT Upload Verification
Verification of the LUT after uploading into the display/LUT Box/Grading system, for final assessment
This is a very simple list, as with ColourSpace 3D LUT Calibration really is that simple.
Volumetric Characterisation
Volumetric Characterisation is the process of accurately measuring the display throughout its entire colour and luminance range, to fully understand the display's raw, pre-calibration parameters.
- Select Characterisation, and the profile type and size to use, with 17^3 being the minimum suggested for final accuracy when using standard Cube Based profiles, although 21^3, or 33^3 or beyond with higher ColourSpace license levels is preferable if time allows
- With Body Centre Cubes, the defined value sets the outer cube size, with a smaller cube held within. For example a 14 size Body Centre Cube will be made of a 14^3 cube containing a 13^3 cube within, so will have approx the same patch count as a 17^3 standard Cube profile. 4,941 patches for a 14 size Body Centre Cube vs. 4,913 patches for a standard 17^3 Cube
- With higher ColourSpace license levels also comes the ability to define the Grey Scale patch count size independently to the volumetric Cube profiling size.
(With ColourSpace, advanced options such as Augment Data, Hint, Custom Filters, and Body Centric Cubes, etc., can be used to increase LUT Generation accuracy, while using smaller initial patch sets)

- Select Anisometric Patch Sequence Sorting, UnSorted or Sequential, although Anisometric is preferable for displays with ABL type issues, or HDR displays with heat related drift issues
(In general, Anisometric sequences work well for all display types) - Drift Compensation can be set to automatically insert a user selected colour patch every nn frames, providing information on display and probe drift.
Note: As much as possible, Drift data should be used to help define the best Patch Set, Stabilisation, Pre-roll, and Drift patches themselves to be used to minimise actual drift during profiling. Relying on Drift data for LUT Generation should be a last resort. - Stabilisation patches can also be defined within the Settings menu, including being set to Full Screen size, to help overcome image retention/burn-in
- The default Closed Loop mode is used for all integrated TPG's, while DIP Mode should be selected for patch sequences generated via external sources
External sources include Ted's Calibration Disc, or timelines built on grading/edit systems via the downloadable edls - Within Characterisation press Start to initiate the volumetric profile
If a delay to the start of profiling is required, set a Pre-roll sequence of the desired duration - The ColourSpace patch window and connected TPG will run through the selected Patch Sequence, displaying the results on the various ColourSpace graphs
- When profiling is complete, the full Volumetric Profile can be saved into the library via the Graph Options menu
3D LUT Generation
The Volumetric profile is a record of the entire display's colour response, including full Gamut, Gamma/EOTF, & Luminance levels, from which 3D Calibration LUTs can be generated for any desired target colour space, using the LUT Tools menu within ColourSpace.

- Access the LUT Tools menu, and within LUT Generation select the target colour space the display should be calibrated to within Source
(The Source colour space is the colour space the source images expect to be seen within; Rec709 for example)

- Within Destination select the previously generated Volumetric Profile for the display being calibrated
- Drift Compensation, if available, shows that the profile has Drift data, and can be used to compensate for any display/probe drift while building the calibration LUT, although using Drift data to generate a LUT is not ideal,and really if drift is bad the cause should be rectified and the profile redone.
Due to the extremely flexible way ColourSpace works there are no restrictions the the way LUT Generation can be used; it is possible to generate LUTs that match Profiles to Colour Spaces, Colour Spaces to Colour Spaces, or Profiles to Profiles, colour spaces able to be user defined, including the use of Parametric Gamma curves.
With higher ColourSpace license levels, it is possible to Double Right Click the Source and/or Destination selection drop-downs when displaying Colour Space or Camera data, to open a Modify window, as available within the main Library options. The Modify window will allow transient changes to be made to the selected colour or camera space, with all changes live updated to the selected colour or camera space, enabling alternate LUTs to be quickly generated. A * by the colour or camera space name within the Modify window signifies the active colour/camera space has been modified from the library original.
As the Modify window is non-modal, it can be kept open and different LUTs generated with different Colour/Camera settings.
As soon as the Modify window is closed, the colour/camera space will default back to its original selection/settings.
Also with higher ColourSpace licenses the size of the LUT generated can be set to any cube size desired, rather than using the default 33^3 size, with sizes up to 256^3 and beyond being possible.

Any changes made to the selected colour or camera space will not be saved into the Library unless the Save button is used.
- From within Output select the preferred method for LUT Generation. The default is Peak Chroma, and is the most likely correct option
- Enter a suitable LUT Name, and select Create to generate a 3D Calibration LUT using the selected options
New LUT will generate a new, independent LUT, while the Add options can be used to concatenate the generated LUT with any existing LUT already held within ColourSpace
Higher ColourSpace license levels have multi-threading capability, enabling the Create button to be used multiple times with different Source/Destination configurations, or multiple LUT Generation windows to be active, as well as enabling other ColourSpace functions to be accessed while LUTs are being generated, and enabling the ability to natively generate larger LUT sizes than the default 33^3 cube size, including 256^3 and beyond.
LUT Checking
After generation, the LUT is held within ColourSpace, and can immediately be viewed as a 3D Cube showing the LUT volumetrically, a 1D Graph showing the LUT's grey scale, and as a LUT Image, which shows the LUT applied to a visual image - pre-set image, or user selected.

The LUT Cube viewer shows the correction the LUT will apply.

The 1D LUT viewer isolates the LUT's grey scale for independent assessment.

The LUT Image viewer enables the LUT to be applied to any test image to assess its effect.
The Cube viewer shows the corrections the LUT is going to make to the display in volumetric space. A Cube that is compressing the colours shows that the display's profiled Gamut is larger than the target colour space, which is good for accurate final calibration. If the Cube has colour points that are squashed against the edge of the cube, that shows the display's Gamut is smaller than the target, which is bad for accurate calibration.
The 1D LUT Viewer shows the changes to the grey scale/white balance and Gamma/EOTF the 3D LUT will make. If the display's grey scale/white balance and gamma/EOTF have been corrected during the manual display set-up, as defined previously, this graph will show a single straight line. If the graph shows three RGB lines with separation, that shows the LUT is correcting grey scale/white balance.
With higher-level ColourSpace licenses, hovering over the 1D Graph shows a Hamburger button that enables additional graph options, including a floating values window for any selected point. If Show and Enable have been selected for Point edit, after a point has been selected, hovering over it will display Point Adjust arrows, enabling the selected point to be manually adjusted, as well as allowing the values in the floating window to be directly edited. Repeated double clicking of a given point will cycle through all three RGB colours, should they all have the same coordinates.

The floating Point Adjust values window can be repositioned using the top bar, and if placed over its active point will re-dock back to its default location.
The LUT Image Viewer can be used to view the LUT on any image within ColourSpace, which will show any possible issues with the generated LUT.
Active LUT Verification
With the LUT still held within ColourSpace the actual calibration result can be verified using the Active LUT function.
- Make sure the external TPG is still connected, and ColourSpace is still talking to it
- Verify the setups under Settings and Probe Options, and set as required, setting Min & Max Luma target values to the display's actual values, if desired
- Within Settings, use the drop-down Active LUT menu to select the generated LUT from within ColourSpace
- Select the desired profile mode to apply through the Active LUT
With Active LUT selected, all calibration patches sent to the display via ColourSpace, or the external TPG, are pre-processed via the LUT, so verifying the 3D LUT Calibration. After the profile is complete the various graphs with ColourSpace can be used to assess the LUT accuracy.
LUT Upload Verification
The final phase in Calibration is to Upload the LUT into its final location for use, and to re-run the the previous verification procedures to ensure there are no issues with the LUT upload and application.
The actual LUT Upload procedure will be different for different LUT devices, and may use the in-built Hardware Upload feature of ColourSpace, or may require the LUT to be exported and loaded via the LUT device's own software. Refer to the associated Hardware Integration Guides for more information.
If any differences are seen between this final verification and the previous Active LUT verification within ColourSpace there is something wrong with the device being used to apply the LUT.
One possible error is that the LUT device needs the 3D LUT data to be re-scaled to Legal Video range, within a data range LUT before being used, if the signal path is TV Legal. Use the Video Scale options within ColourSpace, if needed.